These black pointes are Bloch 'Aspirations' with Bloch 'Elastorib' ribbons.
These 'babies' in action!

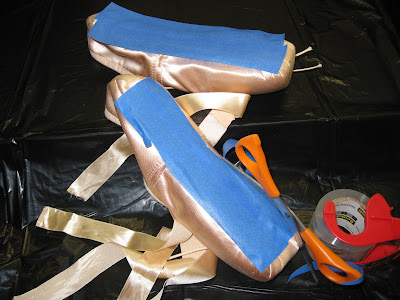
ABOVE: What you'll need for the job. Painter's tape is available everywhere. Get Kiwi black leather shoe dye easily online.
BEFORE YOU START ANYTHING: Be sure to line your work area with heavy double layered 'garbage bags' to protect your surfaces. I suggest using white paper towels (instead of newspapers, for instance) for mopping up spills, etc., in order to avoid ink transfer from newsprint onto your 'pretty pointes', inside or outside.
To begin, assemble the following:
1) a large garbage bag
2) paper towels
3) scissors
4) painter's tape
5) Kiwi brand black shoe dye
6) 70% isopropyl alcohol (rubbing alcohol) to wipe up 'spills' and remove dye from hands
7) nitrile (purple or blue) gloves (preferred) or vinyl gloves to protect hands
8) protective eyewear (glasses or goggles) to protect against accidental eye splash
9) one pair pointe shoes (with ribbons attached or with ribbons to be dyed separately and to be sewn on later). You may also wish to 'skip' dyeing any ribbon and simply purchase 7/8" black ribbon for use on your newly dyed black pointes. Please note that I recommend that you NOT sew elastics on before dyeing, if possible, since the elastics will be one more thing you will have to be careful with come dyeing time! If you are dyeing a pair of shoes with elastics already attached, tuck them in carefully and stuff lots of paper towels on top to protect them from 'errant dye'. You want your elastics to match your tights, not your pointe shoes!
ABOVE: Bloch 'Aspirations' dyed pink-to-black here (without elastics)
BARB'S DYE PROCESS FOR POINTES
(& ALL SATIN SHOES)
The first step is to cover the soles of the pointe shoes with 'blue' painter's tape (two rows approximately 8" long). See photo below. I used 'Scotch 3M' brand here. Gently press the tape against the soles so that the 'outline' of the sole is visible 'through the tape'. Then, with a sharp implement, carefully 'cut away' the excess tape, so that the sole edges are 'clean'. I used a single scissor blade to do this, but you can also use an 'Exacto' knife if you can wield it with care. WHATEVER YOU USE, BE SURE NOT TO ACCIDENTALLY CUT or SCORE THE SATIN WHEN YOU CUT AWAY THE BLUE TAPE!
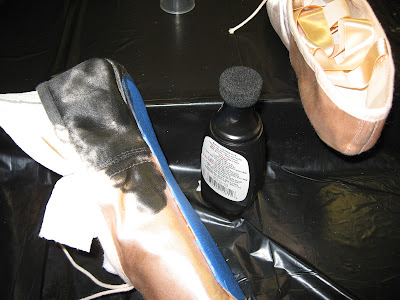
If ribbons are attached to your shoes 'tuck them in' and stuff your pointe shoe with 4 or 5 clean paper towels. Using Kiwi Brand Black leather dye, start 'daubbing' the dye with the bottle-applicator. Start at the rear of the shoe and work your way 'around', being careful to apply a good even layer WITHOUT saturating the shoe. It's better to use two even coats than one 'heavy' one.
Apply a first coat of dye (left shoe) and then after allowing to surface-dry briefly (an hour or so), apply a second coat of dye. Touch up any areas that need it and allow the pointes to surface dry again. Once you are satisfied with the overall coverage, carefully pull out the 'strings' (drawstring ends) and color them, as well. (BELOW)
Again inspect your shoes and set them upon some (standing upright) plastic cups to maximize air circulation. Your final 'step' is to 'untuck' and dye the ribbons, one at a time, starting with the area closest to the shoe and working out to the ends. It is easiest to dye the ribbons in the cup of your hand, as one would apply 'hair highlights'. Be sure to give the ribbon at least two coats of dye or as much as is needed for the color to be absorbed uniformly. Wipe up all drips/slight pooling of dye and let the ribbons rest on plastic (not paper) for the final drying. (Paper will tend to 'wick away' some dye during the drying period which will result in 'uneven' coloring...So set your pointes on plastic.)
When your shoes are totally (or almost) dry, carefully peel away the painter's tape. Be sure to remove ALL of the tape. DO NOT "TRY OUT" your pointes UNTIL THEY ARE PERFECTLY DRY!
As for the random 'dye mistakes' which may manifest on the INNER lining of your shoes, a simple 'cover-up' with buff colored 'Wite-Out' should do the job to conceal these little slips. The 'Wite-Out' will not affect anything negatively and will help create a neater-looking final job.
ABOVE: Voila! A couple of 'dye mistakes' are gone!
Here is the final product. NOTE: As I mentioned, this particular dyeing method is good for satin pointe shoes and for all satin shoes in general...purses, too. This dye is apparently highly water-resistant and does not stain tights or scuff floors. I am in the process of 'testing out' and 'abusing' my black-dyed Blochs here...and, thus far, the only 'wear' I can detect is the normal 'wear and tear' all point shoes receive during wear. Logically, if I see a need to 'touch-up' the platform areas or perhaps the 'over-worked ribbons', then I'll do it, remembering to let my pointes dry thoroughly before dancing in them again!I can't say how many 'pairs' may be dyed with a single bottle of Kiwi dye, but I would 'guess' at least two or maybe two-and-a-half pairs, figuring two coats per shoe. Be sure to always keep some extra dye on hand to use for 'touch ups' before a special class or a performance.
I hope you have great success with this dyeing method and dance extremely well! Stay tuned for articles on other dye methods ('Rit', other shoe dyes, Sharpie, etc.), coming soon.
God Bless You!
Rev. Barb
Rev. Barbara Sexton
"The Biblical Biochemist-Where Science Meets the Cross"
www.DearOnesHealingMinistry.blogspot.com
A pretty good job with these inexpensive 'Bloch's' dyed from pink-to-black!
ABOVE: More shots of me modeling my 'handiwork'. I think with high-resolution photographs, I could have 'neatened up' the sole edge a bit more (with some dye and a paint-brush) in the picture above. From a distance, of course, this is not a problem, but 'purists' can keep this in mind when 'absolute perfectionism' is called for.
QUESTIONS/COMMENTS: BarbaraKSexton@aol.com


No comments:
Post a Comment